The need to securely delete files on your hard drive depends on whether you’re using a regular hard disk drive (HDD) or a solid-state drive (SSD). You don’t need to delete files on an SSD securely.
Securely Erase Files on Solid State Drives (SSDs) vs. Hard Disk Drives (HDDs)
Older Macs came with regular hard disk drives (HDDs). Newer Macs now come with solid-state drives (SSDs), and you cannot securely erase files on an SSD. You can use the standard method of erasing files (moving files to and then emptying the Trash) on SSDs. Beginning with Mac OS X 10.3, Apple introduced the Secure Empty Trash feature to increase security. The feature followed the U.S. DoD pattern of overwriting data seven times. However, Apple removed the secure erase features in OS X 10.11 El Capitan because new Macs contained SSDs by default. When you store a file on a regular spinning hard disk (an HDD), it occupies a physical location on the disk’s surface. This means overwriting it with junk data prevents that file’s contents from ever being recovered. SSDs move files around, so if you try to overwrite a file, you end up creating a new file in a new location instead of overwriting the contents of the old file. The old file is still on the SSD and could potentially be recovered. Secure deletion on SSDs just doesn’t work.
“HDD vs. SSD Test” by Simon Wüllhorst is licensed under CC BY 2.0 Whether you’re using a regular HDD or an SSD, a better way of making sure your data is secure is to encrypt your drive using FileVault. You don’t need to securely delete individual files because FileVault encrypts everything on the drive. Files are decrypted on the fly as you open them. When you close them, they’re encrypted again. But if you’re not comfortable using FileVault and you’re still using an older Mac with a regular HDD, you should use a secure method of deleting private and sensitive files. Today we’ll show several methods you can use.
Securely Delete Files Using the Terminal
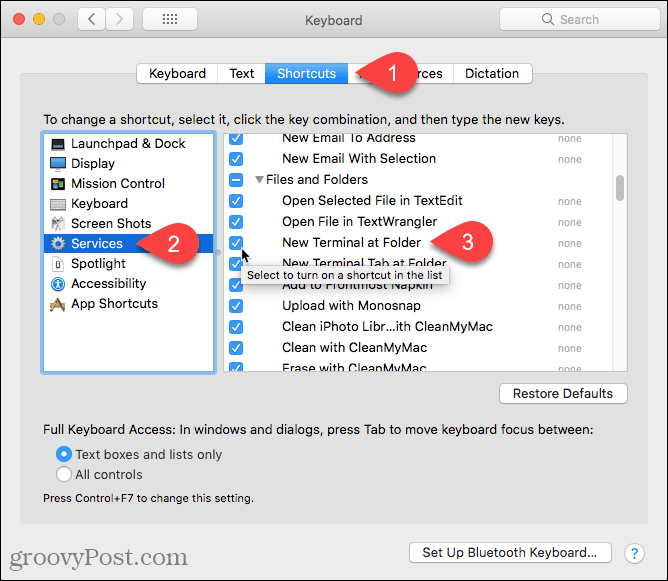
The command line used to include the “srm” command that allowed you to securely delete files and folders. Apple removed this command in macOS Sierra for the same reason they removed the Secure Empty Trash feature. However, you can get around this using the “rm” command in the Terminal. This command allows you to delete files and folders on your Mac. But you can also use it to securely delete files and folders. The easiest way to do this is to open a folder directly from Finder in Terminal using a service. The New Terminal at Folder service should be enabled by default, but let’s check. Go to Apple Menu > System Preferences > Keyboard. Then, click Shortcuts at the top of the dialog box. Click Services on the left and make sure the New Terminal at Folder box is checked. You can also enable the New Terminal Tab at Folder service if you want to open the folder in a new tab in a current Terminal window.
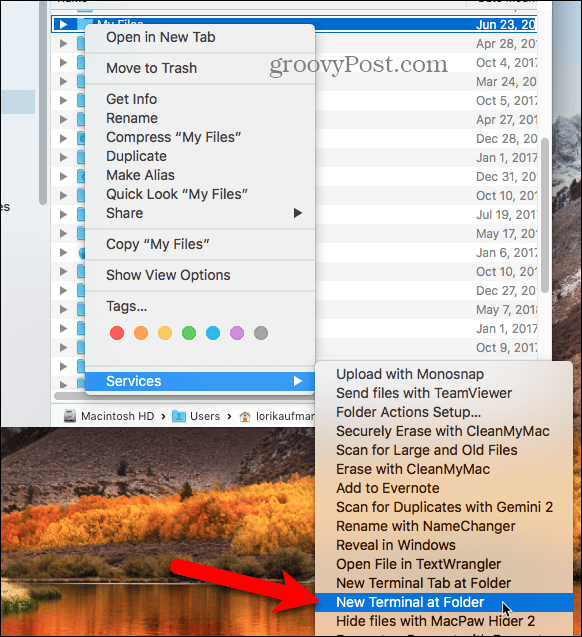
Open Finder and navigate to the folder containing the files you want to securely delete. Right-click on the folder (do not go into the folder) and go to Services > New Terminal at Folder.
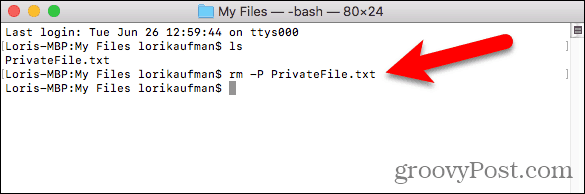
At the command prompt, type the following command, replacing the file name with the name of the file you want to delete.
Securely Delete Files Using TRIM
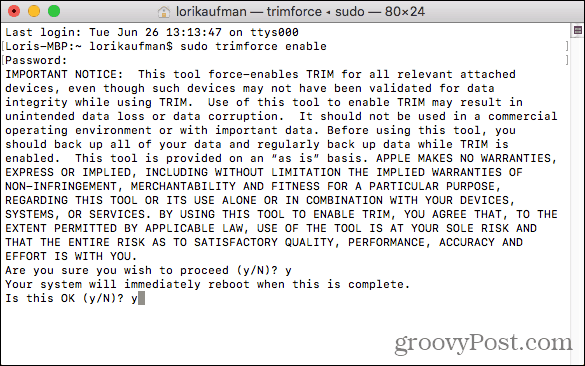
If your Mac came with an SSD when you bought it, it came with a built-in tool called TRIM. When you delete a file from any drive (HDD or SSD), macOS marks that space as “not in use”. On an SSD, a TRIM command runs automatically wiping the data in that marked space. This allows the SSD to write data to that marked space as if it was never used. If you have an old Mac that came with a regular HDD, or you installed an SSD in your Mac after buying it, you can manually enable TRIM using the “trimforce” command. Apple warns that using TRIM “may result in unintended data loss or data corruption.” Apple does not warrant the TRIM tool and they warn that you use it at your own risk. If you decide to enable TRIM, you should first back up your Mac, using Time Machine or another backup tool. Type the following command to enable TRIM: An important notice displays and asks if you want to proceed. Type: y and press Enter if you want to enable TRIM after reading the warning. Then, type: y and press Enter again to indicate it’s OK to reboot after enabling TRIM.
Securely Delete Files Using an Encrypted Disk Image
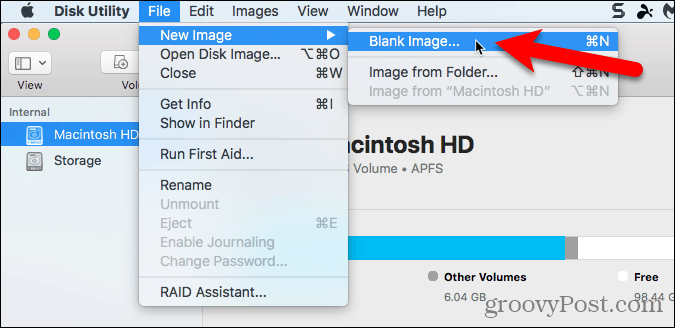
A lot of software for the Mac is distributed in disk images or .dmg files. Disk images are also a convenient way to package up and securely distribute files over the internet or just store them for yourself. You can move a locked .dmg file anywhere like Dropbox, OneDrive, or Google Drive, and share the file. Or you can store the .dmg file on an external drive. You can easily create disk images yourself and encrypt them using Disk Utility. Encrypted disk images are like secure vaults for your private and sensitive files. If you have many files and folders you want to securely delete, an encrypted disk image is a good solution. You can move the files and folders you want to delete into the disk image, lock the image, and then delete the .dmg file. The disk image encrypts the files so they’re unrecoverable. Be sure you don’t delete a disk image that contains files you want to keep. Also, don’t delete files from an open disk image. This puts them in the trash like regular files. Move any files you want to securely delete into a new disk image created just for deleting. To create an encrypted disk image, open Disk Utility from the Applications > Utilities folder. Then, go to File > New Image > Blank Image.
On the dialog box that displays, enter a name for the disk image in the Save As box. Be sure the name contains “.dmg” at the end. Select Where to save the disk image file, enter a Name, and specify the Size for the disk image. Type a space and then KB, MB, GB, or TB after the number. To encrypt the disk image, and require a password to open it, select an Encryption method. Apple recommends the 128-bit AES encryption choice because it makes the disk image very secure, without being too slow.
When you select an Encryption method, a dialog box automatically displays asking for a password. Enter your password twice and then click Choose.
Then, click Save.
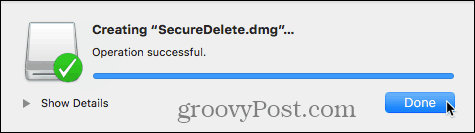
Click Done on the progress dialog box once the operation is successful.
Your new disk image shows up under Disk Images in Disk Utility. Double-click on the disk image name to open it in Finder.
Move any files and folders you want to delete into your new disk image.
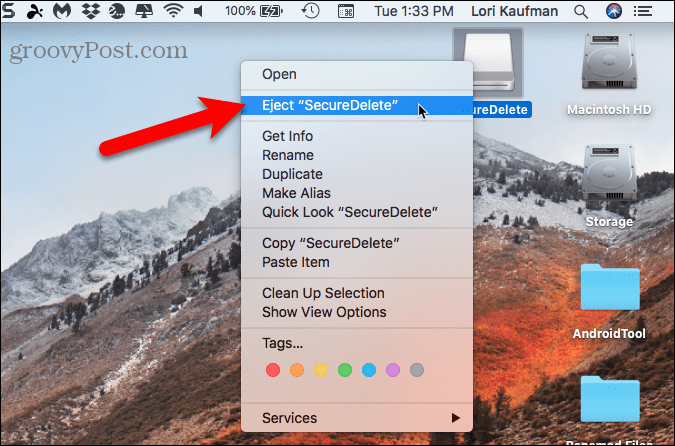
To close and lock the disk image, right-click on the disk image’s icon and select Eject.
Any files you copy to the disk image are encrypted. You can move the .dmg file to the trash and the files inside it are securely deleted. Even if they are recovered, they will not be readable.
Securely Delete Files Using a Third-Party App
There are several apps that allow you to securely erase files. We’ll show you one free app and one paid app.
Permanent Eraser (Free)
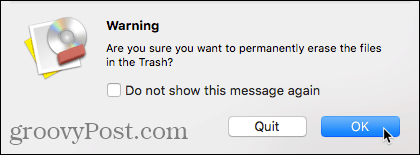
Permanent Eraser is a free app that allows you to securely delete files using one of several wiping methods like 3-pass DoE or 35-pass Gutmann. The app overwrites the files multiple times, scrambles the original file names, and truncates the sizes of the files to nothing. Only after doing all that does Permanent Eraser unlink the files from the system. You should only use Permanent Eraser on regular HDDs, not on SSDs. Once you’ve downloaded and installed Permanent Eraser, let’s set it up. When you run the app, you’ll see a dialog box asking if you’re sure you want to permanently erase the files in the Trash. Do not do anything on this dialog box yet.
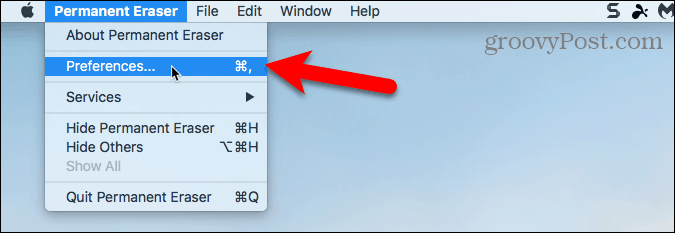
On the menu bar, go to Permanent Eraser > Preferences.
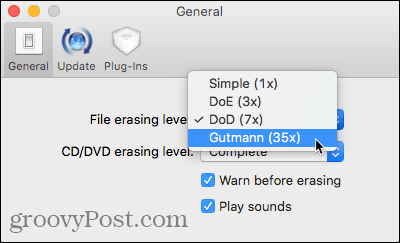
On the General screen, select the File erasing level. DoD (7x) is selected by default. Note that the Gutmann level will take a long time because it writes over the data being deleted 35 times.
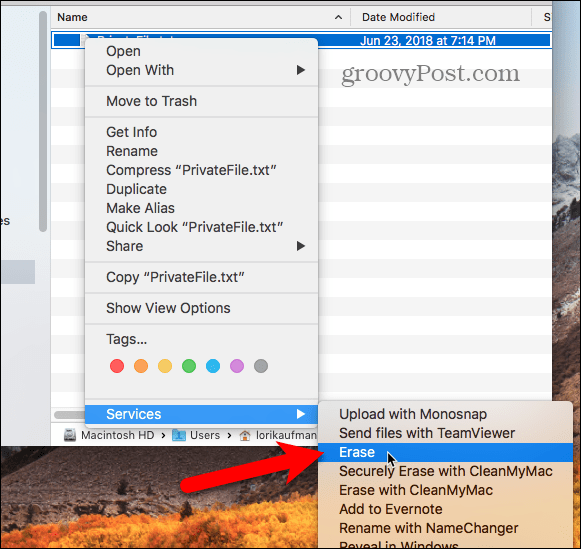
If you want to add an option to permanently erase items in Finder using the context menu, click Plug-ins on the toolbar. Then, check the Install Contextual Plug-in box.
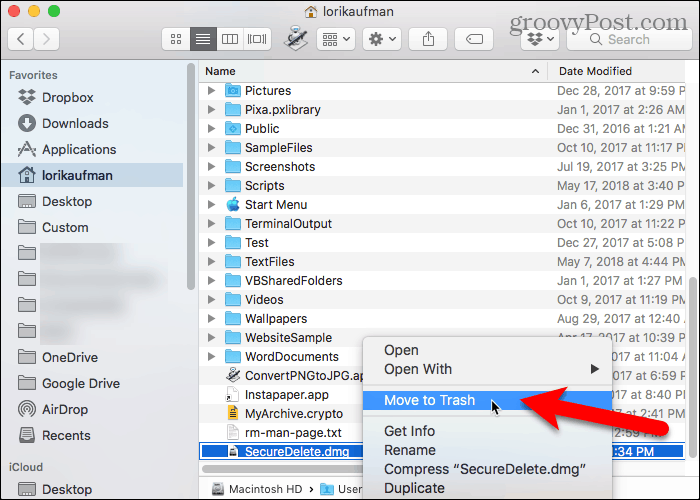
Once you’ve installed the plug-in, select the items you want to delete in Finder. Right-click on those items and go to Services > Erase.
You’ll see the Warning dialog box. If you don’t want to see this dialog box every time you use Permanent Eraser to delete files, check the Do not show this message again box. Click OK to permanently delete the selected items. You can re-enable the Warning dialog box by going to Permanent Eraser > Preferences and checking the Warn before erasing box on the General screen.
Use Permanent Eraser Directly in Finder
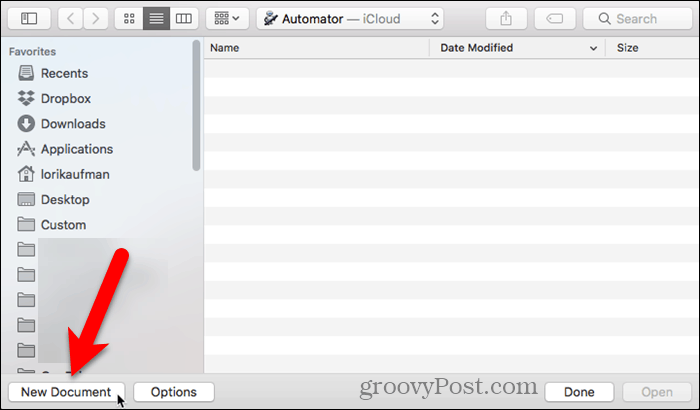
If you’re using OS X 10.4 or later, Permanent Eraser adds Automator Actions you can use to create an app you can add to the Finder toolbar. This Automator app allows you to select items to delete in Finder and drag them to the app’s icon on the Finder toolbar. To create an Automator app using a Permanent Eraser Automator Action, open Automator from the Applications folder. Then, click New Document.
Click Application under Choose a type for your document. Then, click Choose.
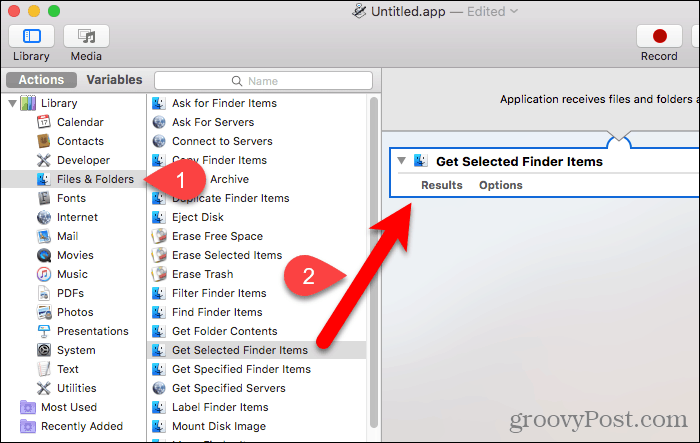
In the far left pane, click Files & Folders under Library. Then, drag Get Selected Finder Items in the middle pane to the right pane. This action gets the items you select in Finder and passes them to the next action.
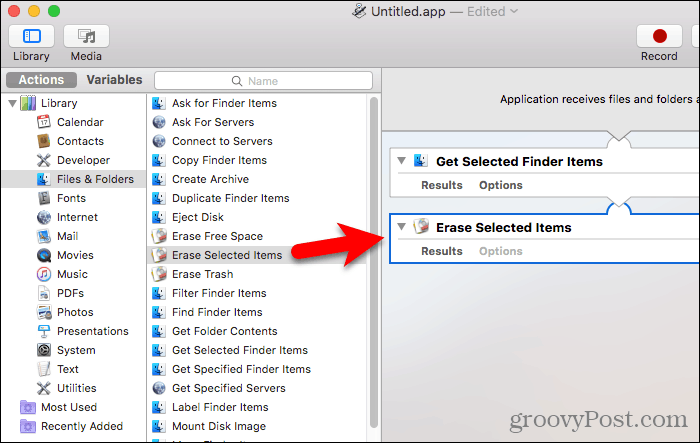
Now we add one of the Permanent Eraser actions to delete the selected items. Drag the Erase Selected Items action from the middle pane to the right pane under the Get Selected Finder Items action. To save your application, go to File > Save. Enter a name for your app, select where to save it, and click Save.
To add your new Automator app to the Finder toolbar, open Finder and go to the folder where you saved the app. Press Option + Command while you drag the app to the Finder toolbar. You can also drag the app to the dock to use it there.
To use your new Automator app to securely delete files, select one or more files in Finder and drag them to the Automator app icon on the toolbar. Or, if you added the app to the dock, drag the files you want to delete to the app’s icon on the dock. Click OK on the Warning dialog box (if you didn’t disable it).
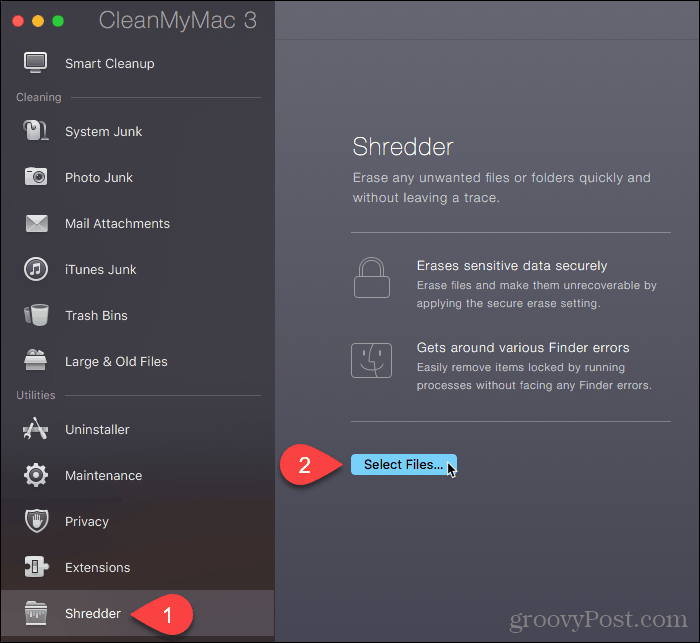
CleanMyMac 3 ($39.95)
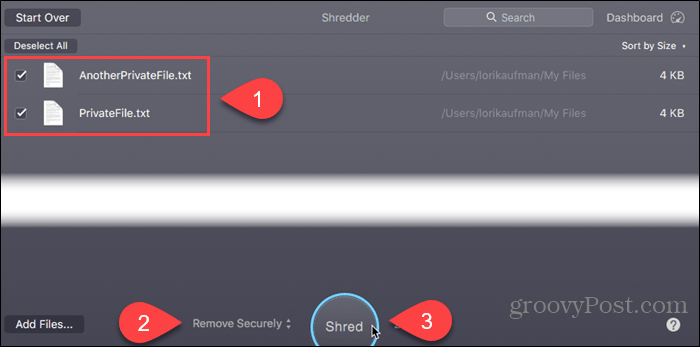
You may think the price for CleanMyMac 3 is high just for securely deleting files. But it does a whole lot more than that. It helps you clean, maintain, and optimize your Mac by completely scanning your system and safely removing gigabytes of junk in just a couple of clicks. CleanMyMac 3 also monitors the health of your Mac and alerts you to problems like heavy memory use, low SSD life, and high disk temperatures, and tells you how to fix them. You can try out CleanMyMac 3 before buying it. To use the app to securely delete files, download and install the app. Open the app and click Shredder at the bottom of the list on the left, under Utilities.
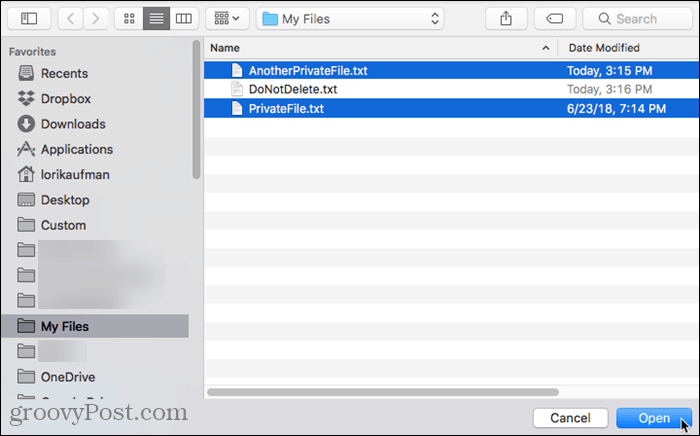
Navigate to the folder containing the files you want to delete and select them. Then, click Open.
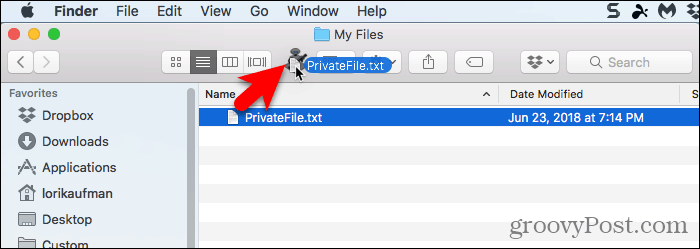
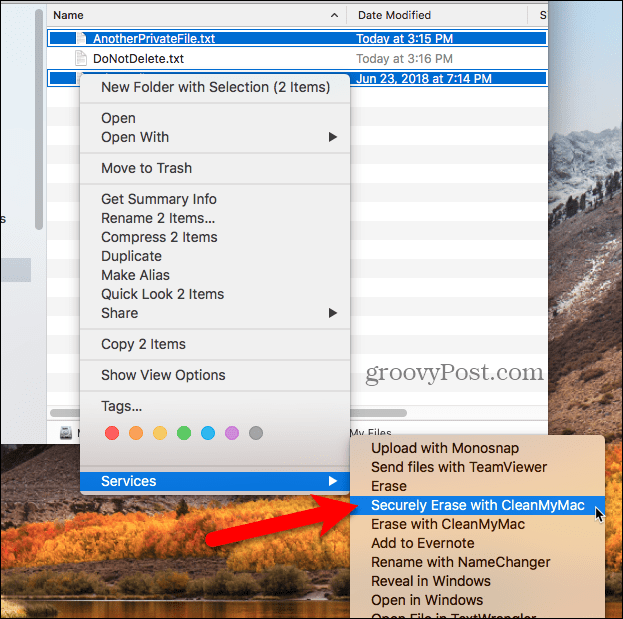
You can also add files to the Shredder in CleanMyMac 3 from Finder. Open Finder and go to the folder containing the files you want to delete and select them. Right-click on the selected files and go to Services > Securely Erase with CleanMyMac.
CleanMyMac 3 adds the selected files to the Shredder list and automatically checks all of them. Select Remove Securely from the drop-down list at the bottom of the window. Then, click Shred.
Click Shred on the confirmation dialog box.
Protect Your Data Even When Deleting It
Before deleting files, securely or not, be sure you back up your data just in case something goes wrong. You might also want to consider encrypting your hard drive using FileVault. That way you don’t have to worry about securely deleting files. FileVault encrypts everything on your Mac. How do you securely delete your files? Do you encrypt your hard drive? What tools do you use to secure your data? Share your thoughts, ideas, and suggestions with us in the comments below! With APFS ‘smart copy’, the moment those files were encrypted that would surely only affect the copies. I can’t see how the data for the original files would be securely erased in this process. Quote: “You can easily create disk images yourself and encrypt them using Disk Utility. Encrypted disk images are like secure vaults for your private and sensitive files.” Correct, but ONLY for files that are created ON the encrypted virtual disk. Files that are COPIED from a regular HDD or SSD still exist in the original location unless they are securely removed. “If you have many files and folders you want to securely delete, an encrypted disk image is a good solution. You can move the files and folders you want to delete into the disk image, lock the image, and then delete the .dmg file. The disk image encrypts the files so they’re unrecoverable.” NO. Only the copies are encrypted. Throwing away the disk image does ABSOLUTELY NOTHING to securely erase the original files. THE ORIGINALS STILL EXIST ON THE SOURCE DISK unless they are securely erased using another method! “Also, don’t delete files from an open disk image. This puts them in the trash like regular files.” NO. Deleting files from an open ENCRYPTED disk image is PERFECTLY OKAY. The files do not get moved to the trash of the operating system that mounted the disk image. “Move any files you want to securely delete into a new disk image created just for deleting.” We’re back to the reason I came to the comments to post in the first place. Moving the files to an encrypted disk image does nothing. You have to securely erase the source files if you’re concerned about security. THAT SAID, an encrypted disk image will provide you with strong privacy PROVIDED you create your files on that virtual disk image and use a STRONG encryption key. Macs have had the ability to encrypt a user’s home directory since the early 2000’s (Mac OS X 10.3 PPC days) into a disk image (FileVault) so if you’re running a PPC still and you’re worried about the privacy of your files enable it. In ‘recent’ years (relatively speaking :), FileVault has become a whole-disk encryption tool and Apple has abandoned the encrypting of a user’s home directory into a disk image (Windows Home users only finally got some form of encryption in 2015 with Windows 10 and even then it’s quite rudimentary compared to FileVault or what is offered to Windows Pro users). FileVault in the Intel era will also give you protection from recovery of deleted files. With an encrypted disk it’s almost impossible to recover a conventionally deleted file. If you’re concerned about privacy and security, turn on FileVault, use a strong password and forget about all this secure erasing headache. Without the password no hacker will ever be able to access your files, EVEN IF THEY HAVE PHYSICAL ACCESS TO YOUR COMPUTER. FileVault is not the full solution. I say this because some people travel to some countries where law exists on paper only and in such places it wouldn’t take long for the FileVault password to be obtained. Such target groups would love to be able to backup a set of MacBook documents then erase them completely before travelling. Then, if stopped by authorities at the destination, they see nothing that may interest them, not even with data recovery tools. The idea that either you totally erase an SSD or encrypt it is not enough. A solution is needed where some files on an SSD can be totally obliterated without damging the SSD itself. Comment Name * Email *
Δ Save my name and email and send me emails as new comments are made to this post.


![]()
