Article Map
Setting Up OneNote on your iPhoneViewing and Editing OneNote Notes and Notebooks on Your Windows Live SkyDriveCreating Sections and Organizing Notebooks in Office LiveWorking With Synced Notebooks from the Microsoft OneNote Desktop VersionConclusion: OneNote in Real Life
What You’ll Need
The big, big limitation of the Microsoft OneNote app for iPhone is that to get the most out of it; you’ll need a lot of proprietary Microsoft stuff. If you don’t have all of the following, you may as well stop right now and try Evernote:
iOS 4.x.x or laterMicrosoft OneNote (included in Microsoft Office Home and Student, Home and Business and Professional)Internet Explorer 6 or laterWindows Live IDWindows Live Essentials 2011
You read that right—if you are a Mac user, you are mostly out of luck. The only way to sync OneNote notes from your iPhone is through your SkyDrive, and the only way to work with SkyDrive notebooks is through Office Live or Microsoft OneNote. Currently, there is no Microsoft OneNote for Mac. Sorry.
Setting Up OneNote on your iPhone
By default, the iPhone OneNote app saves notes to the Personal (Web) notebook. This is where all of your Quick Notes will be saved. If you don’t already have this notebook, it’ll be created once you launch the iPhone app for the first time, so this is a logical place to start.
Step 1
Download the Microsoft OneNote App for iPhone from the App Store. Hurry, it’s free—for now!
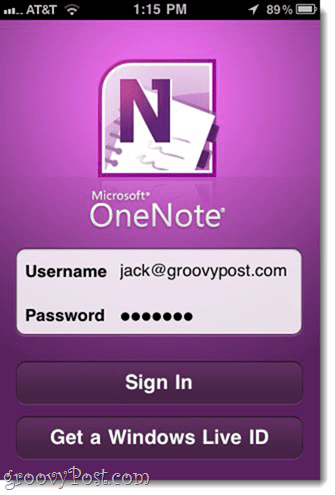
Step 2
Launch the OneNote app and log in with your Windows Live ID.
If you don’t’ have one, tap Get a Windows Live ID to get one.
Step 3
At this time, you may as well go ahead and create your first note so that you can get familiar with OneNote’s functionality and see how it syncs to the cloud and back again. Tap Quick Note on the bottom toolbar.
This will create an unfiled note in your Personal (Web) notebook.
Step 4
Add text, photos, bulleted lists, and a checkbox to your note. The buttons that appear above the keyboard have the following functions from left to the right:
Start bulleted listStart checkbox listAdd a photo (existing or take new)Hide keyboard
The note will save automatically, but when you’re done and want to navigate away, tap the button on the far-right to hide the keyboard.
To return to your notebook, touch the section name (here, it’s “Unfiled notes”) in the top-left.
Step 5
As you can see, your note was placed in the Personal (Web) notebook in the Unfiled Notes section.
Unfortunately, you can’t rearrange notes, add sections or add notebooks from the iPhone app. That’s a bit of a downer, but it’s best to think of the iPhone as a collection “bucket” rather than a real workspace. For more nitty-gritty work, we’ll move to Office Live or Microsoft OneNote in Windows.
Viewing and Editing OneNote Notes and Notebooks on Your SkyDrive
Even if you don’t have Microsoft OneNote installed, you can get the full range of editing and organization features through Office Live. While this isn’t ideal, it doesn’t require you to buy anything, which is totally groovy in my book.
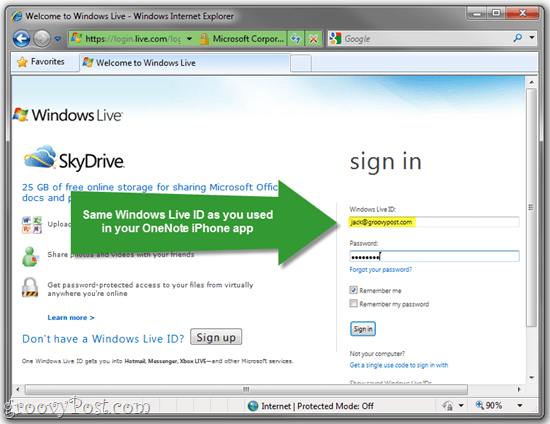
Step 1
Visit http://skydrive.live.com and log in using the same Windows Live ID credentials as you used with your iPhone app.
Step 2
Click My Documents.
Step 3
Under My Documents, you’ll find your Personal (Web) notebook that you’ve been using with your iPhone app. To see the notes inside, Mouse-over the notebook and click Edit in browser.
This opens the notebook in Office Live.
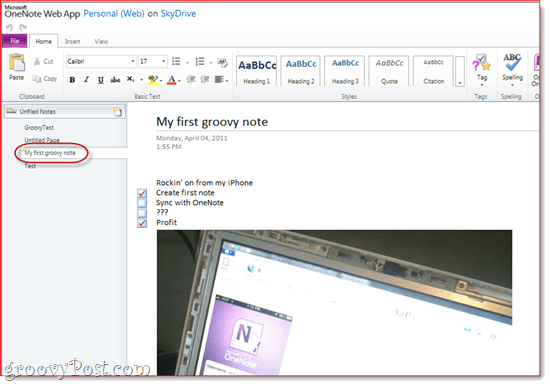
Step 4
You’ll find your note listed in the Unfiled Notes section on the left.
Creating Sections and Organizing Notebooks in Office Live
Recall that you can’t add notebooks or re-arrange notes in the OneNote iPhone app. But you can see it in Office Live. This is where you’ll want to set up your notebooks and organize any notes that you punched in on the fly on your iPhone.
Step 1
Right-click the area on the left-hand side and choose New Section. Give your section a name.
Step 2
Drag and drop notes from one section to another. You can organize all your notes in this way.
Step 3
Now, check back on your iPhone app, and you’ll see the sections you’ve created.
From your iPhone app, you can add notes to the section of your choosing by navigating to it and tapping the + sign.
Working With Synced Notebooks from the Microsoft OneNote Desktop Version
I don’t know about you, but I always prefer to use the real thing whenever I want to get serious work done. Here’s how to use the desktop version of OneNote and have your changes synced across your iPhone app and your SkyDrive notebooks.
Step 1
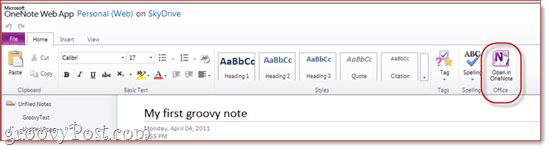
From SkyDrive, click Open in OneNote wherever you see it. It appears in the Office Live editing window.
And in your SkyDrive.
Step 2
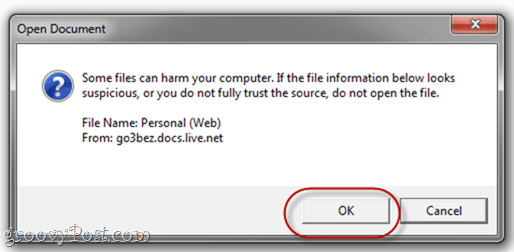
When warned of the potential harm that files from the Internet can inflict on your computer, click OK.
Note that go3bez.docs.live.net will show up under your network places after you do this. Don’t be alarmed. It’s how Windows accesses your SkyDrive from Windows Explorer.
Step 3
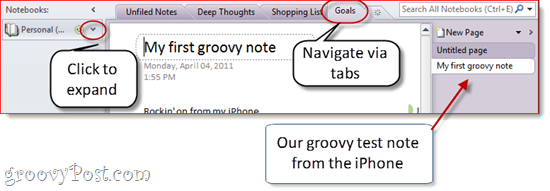
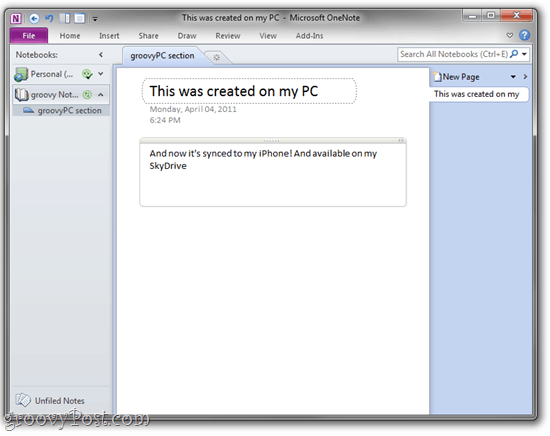
Microsoft OneNote will now open the notebook directly from your SkyDrive. You can see the name of your synced notebook on the left.
The Sync icon next to it lets you know that it’s saved to the web.
The notebook sections will be on the left, and the individual notes will be on the right. This is a bit confusing since this is handled differently on Office Live, but no big deal. You can also navigate through sections via the tabs along the top. You can create new sections by Right-clicking on the left-hand side. You can create new pages by clicking New Page on the far-right.
Step 4
To create a new notebook and sync it to your SkyDrive and iPhone, click File in OneNote and choose New.
Step 5
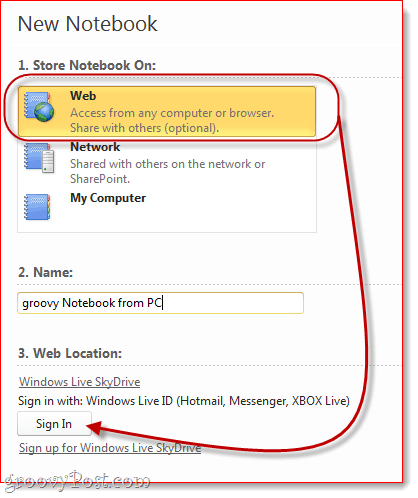
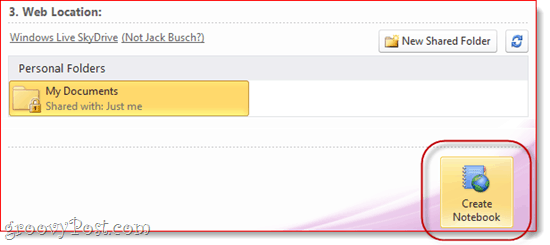
Under New Notebook, choose Web where it reads “Store Notebook on.”
Give your notebook a name, and then click Sign In under Web Location.
Step 6
If prompted, enter your Windows Live ID credentials.
Step 7
At this point, you can choose a folder to save it in, or you can stick it in My Documents.
When you’re done, click Create Notebook.
Step 8
Go ahead and create some notes.
The notebook and notes you created will now be available on your iPhone and your SkyDrive.
The best part is that your notebooks stay open in OneNote. So, you don’t have to go to your SkyDrive each time you want to access them. Just leave them open in OneNote, and each time you launch OneNote from your Windows PC, you’ll see them sitting there, synced and ready for you to get back to your to-do list.
One last thing, OneNote for iPhone syncs automatically, but tap Settings and tap Sync Now if you ever get impatient.
Conclusion: OneNote in Real Life
As you can see, the OneNote for iPhone is only one piece of the puzzle. To get the most out of this app, you need to incorporate SkyDrive and the desktop version of Microsoft OneNote into your workflow. So, essentially, you would use:
Microsoft OneNote (desktop) for creating new notebooks and “serious” work.Office Live (via the web) for accessing notes from public computers or on someone else’s machine (or a Mac).OneNote for iPhone for capturing thoughts, to-do lists, ideas, and pictures.
Office Live also lets you share notebooks with other Windows Live users, making it a fairly powerful collaborative tool. You can use a shared OneNote notebook to keep track of a grocery list or honey-do list with your spouse. Or you could make a notebook available to your friends and family and use it as a private photo feed. And, of course, given the number of notebooks and sections you can create, you can easily turn your OneNote for iPhone app into a powerful bucket for your OneNote GTD system. The strengths of the iPhone OneNote app are that it’s slick, reliable, works seamlessly with your SkyDrive, Office Live, and the Windows version of OneNote, and is the only official Microsoft Office app available for the iPhone. I know there’s been a lot of poo-pooing of this app on the blogosphere, but I think if you can learn to enjoy using OneNote, the iPhone app will become your best friend. Comment Name * Email *
Δ Save my name and email and send me emails as new comments are made to this post.


![]()
